
|
|
||
|
|
||
|
|
||
|
|
||
|
|
![]()
PIONEER LD-V1000 / LD-V1001 BOOT SWITCH
Developed by Tony M. Victorino - 30 August 2001
INTRODUCTION
The Pioneer LD-V1000 / LD-V1001 is an industrial laserdisc player with no user controls on the front, which makes it difficult to test the player. This document explains how to issue a "play" command to your LD-V1000 or LD-V1001.
PARTS NEEDED
THEORY OF OPERATION
With this custom-wired connector plugged into the port in the back of an LD-V1000, pressing and holding the button for one full second will cause the player to boot up and start playing a disc.
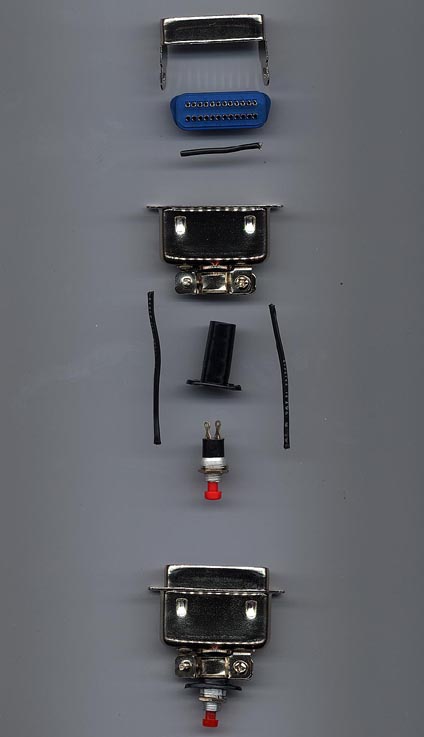
CONSTRUCTION
Strip all wire ends.
Look at the connector, and you will see it is numbered from 1 to 12 on the top and from 13 to 24 on the bottom.
These are the pin numbers of the connector.
Solder a wire from pin 7 to pin 17.
Solder a wire from pin 2 to one end of the button switch.
Solder a wire from pin 24 to the other end of the button switch.
The two wires going to the switch will remain outside of the back of the connector, and the other jumper wire will just sit inside of the housing.
Push the connector together, so that all of the pieces click into place.
Insert the button switch into the back of the connector's housing, and tighten the screws on the back of the connector onto the switch to hold it in place.
(Click on image for larger view)
The cheap way:
On the back of the laserdisc player, the pin numbers are in reverse. On the top it reads 1 to 12 from right to left, and on the bottom, 13 to 24 from right to left.
Take two paper clips and bend them until they are even from end to end in a U shape. Put one of them connecting across pins 7 and 17, then put the other one across pins 2 and 24, and hold for one full second.
DISCLAIMER
The above is believed to be correct and works fine for the author. No one is forcing you to do this. If you break your LD-V1000, it's your fault!
HOME |
LASER GAMES | LASER COMMUNITY | TECH CENTER